Kafka Schema Registry & REST Proxy Concepts
Review of Kafka Schema Registry & REST Proxy concepts in Apache Kafka.
Kafka is a distributed, resilient, fault tolerant streaming platform that works with high data throughput. In this page, the main concepts of Kafka Schema Registry & REST Proxy technologies will be covered.
- The Problem with Data Change and Duplication
- Schema Registry Pattern
- Schema Registry Drawbacks
- Apache Avro and Data Format Comparison
- Avro Characteristics
- Schema Evolution
- Implementing a Schema Registry Pattern
- Confluent REST Proxy
- References
The Problem with Data Change and Duplication
Kafka receives and delivers bytes. It does not know what are in those bytes - and it’s important that it do not know it, since this is a guarantee of performance improvement (by zero copy optimization).
But there are drawbacks in this approach. If the producer send some “bad data” (for instance, rename some required field), consumer will break. In order to avoid such scenario, it is necessary to adopt a schema, that is verified over data in order to avoid things to break.
A Schema can be applied to message key, message value, or both.
In addition to adopt a schema, it is also important that this approach consider data optimization, in a way that data could be separated from schema to avoid duplication (and increase in payload size). Schema Registry can be adopted to solve this problem.
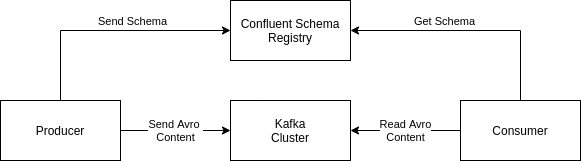
Schema Registry Pattern
Schema Registry is a pattern that separates schema from data. In Kafka, it means that a separate component stores the Schema, and only data is sent to Kafka. So, both producers and consumers must be able to connect and talk to both Kafka Cluster and Schema Registry.
Figure: Schema Registry Pattern.
In this pattern, the payload size to the Kafka Cluster is optimized, because the Schema is sent only to the Schema Registry (and not to Kafka), and only the data (without schema) is sent to Kafka. The consumers and producers are the ones who have to relate Schema with data (and validate/reject bad data based on the schema, ensuring that bad data never reaches Kafka cluster).
In addition, a common data format for the messages must be adopted. This data format must support schemas and evolutions of data, and must be lightweight. Apache Avro is the most used data format.
An Avro file has both Schema and Data. But in the Schema Registry adoption, what happens is the following:
- Avro serializer (in producer) splits schema and data as separate units
- Producer sends the schema to the Schema Registry and receives an ID (if it is a new schema)
- Producer sends data to Kafka. This ID goes in the message metadata
- Consumer gets the message from Kafka.
- Consumer uses the message ID from message metadata to retrieve the schema from Schema Registry
- Avro deserializer (in consumer) uses retrieved Schema to deserialize and read the message
Schema Registry Drawbacks
- A specific setup must be made;
- High availability must be ensured in another point in the architecture;
- Clients (consumers and producers) have to be partially changed (to inform the schema registry url);
- Avro has a learning curve;
- Schema Registry is not present in the Kafka distribution. There is a free and open source product created by Confluent, but some specific features are paid.
Apache Avro and Data Format Comparison
The most basic data format is CSV. This is a very simple and flexible format, but it is fragile, since data types must be inferred.
So, data format evolved to tables. Those have a clear data structure for data types, hence are better than CSV in that regard. However, tables are hard to access (you have to adopt some sort of driver, and each database adopts a different technology), and data must be flat.
JSON data format is much easier to access than tables, since it is a textual format. It also support some data structures, such as arrays, integers, etc, and data do not need to be flat (actually, complex data types must be modeled in that format). It is also a very common data format nowadays. However, it is verbose (there is a lot of duplication) and it does not have a schema.
Apache Avro is a schema written in JSON, and it have a payload (body) of data. Advantages:
- Data Type: It is strongly typed
- Less CPU usage: data is compressed automatically
- Schema: schema goes along with the data
- Documented: documentation goes along with the schema
- Binary Protocol: data can be read between different languages
- Schema evolution: it supports evolution of schemas
Disadvantages:
- It is not supported by all languages
- Data is compressed and serialized, so it cannot be seen without specific tools
Avro Characteristics
Primitive Types
| data type | description |
|---|---|
| null | no value |
| boolean | binary value (true/false) |
| int | 32-bit signed integer |
| long | 64 byte signed integer |
| float | single precision (32 bit) IEEE 754 floating point number |
| double | double precision (64 bit) IEEE 754 floating point number |
| bytes | sequence of 8 bit unsigned bytes |
| string | sequence of unicode characters |
“Signed data” means that data has a “signal” (must be positive[+] or negative[-]). Integer and float and signed data, and bytes area unsigned data (since byte has no signal).
Record Schemas
In Avro, record schemas are defined as JSON. The most common Schema data are listed below:
| Schema Data | Meaning |
|---|---|
| name | schema name |
| namespace | equivalent to Java package |
| doc | documentation that explain the schema |
| aliases | another (optional) names for the schema |
There is also a Fields section, with information related to the field data:
| Field Data | Meaning |
|---|---|
| name | field name |
| doc | documentation of the field (optional) |
| type | a primitive/complex type for data |
| default | a (optional) default value to the field |
Complex Types
Avro complex types are: records, enums, arrays, maps, union and fixed.
Records
Record is just a definition of a new schema inside a field.
schema:
{
  "type": "record",
  "name": "LongList",
  "fields" : [
    {"name": "value", "type": "long"},
    {"name": "next", "type": ["null", "LongList"]}
  ]
}
Enums
Enum is a closed value domain, such as found in languages like Java. A enum type is followed by a symbols attribute, that contains a array of closed domain data.
schema:
{"type": "enum", "name": "Medal", "symbols": ["Bronze", "Silver", "Gold"]}
example data:
{"Medal": "Bronze"}
After defined, enum data cannot change, in order to maintain compatibility with older and newer schema versions (more on that later on this page).
Arrays
These are a list of undefined items that share a same schema. A array type is followed by a items attribute, that defines the data type for its items.
schema:
{"name": "emails", "type": "array", "items": "string", "default": []}
example data:
{"emails": ["someemail@gmail.com", "anotheremail@gmail.com"]}
Maps
Maps are a list of keys/values, with keys always defined as String. A map type is followed by a values attribute, that defined the data type of values in the map.
schema:
{"name": "scores", "type": "map", "values": "long", "default": {}}
example data:
{"scores": {"John": 9.5, "Mary": 9.8}}
Unions
It is not a complex data type per se, but a support for different data types in the same field. If default attribute is being adopted, its value must be of the type defined in the first item of the array.
The most common use case for unions is to defined a optional value, as below:
schema:
{"name": "middle_name", "type": ["null", "string"], "default": null}
example data:
{"first_name": "Joao", "middle_name": "Silva"}
{"first_name": "Maria"}
Fixed
A fixed number of 8 bit unsigned bytes. Types must be “fixed” and is supports two attributes: name and size.
schema:
{"type": "fixed", "name": "md5", "size": 16}
example data:
{"md5": "1122334455667788"}
Logical Types
Logical types are complements from primitive or complex types that aggregate more specialization to the data. These kind of data is serialized according to its “natural” type.
The use of logical types in JSON do not exclude the need for primitive/complex type declaration (their “natural” types). Both must be declared, as below described.
The most common logical types are the following:
| type | complemented from | description |
|---|---|---|
| decimal | bytes | - |
| date | int | days since Unix Epoch Time (1/1/1970) |
| time-millis | long | milisseconds since midnight |
| timestamp-millis | long | millisseconds since Unix Epoch Time (most commonly used) |
Example usage:
{"name": "signup_ts", "type": "long", "logicalType": "timestamp-millis"}
Avro and the Complex Case of Decimals
As known, float and double are binary data (for instance, 10001.10010001). So, they are approximations of the real number, that cannot be precisely represented.
In order to represent a exact number (in case of finances, for instance), one must consider the usage of decimal datatype.
Decimals are adopted for precise result (such as financial data), and floats/doubles are naturally used for scientific computations (less precise than decimal, but much faster).
The decimal datatype in Avro is a logical type, whose natural type is byte. This kind of value cannot be property represented in JSON. So, for decimal datatypes, the best approach so far is to treat it as a String.
Creating Avro Records in Java
There are three types of Avro Records in Java: Generic, Reflection, and Specific.
Avro Generic Record
In a Generic Record, Schema is defined on-the-fly and a generic object is created based on it, using a GenericRecordBuilder. It is a simple approach that do not use any POJO for object modeling, so the lack of typing is present.
import java.io.File;
import java.io.IOException;
import org.apache.avro.Schema;
import org.apache.avro.Schema.Parser;
import org.apache.avro.file.DataFileReader;
import org.apache.avro.file.DataFileWriter;
import org.apache.avro.generic.GenericData.Record;
import org.apache.avro.generic.GenericDatumReader;
import org.apache.avro.generic.GenericDatumWriter;
import org.apache.avro.generic.GenericRecordBuilder;

public class GenericRecordExample {

  public static void main(String[] args) {
    // 0: define schema
    Schema schema = new Parser().parse("{\n"
        + "     \"type\": \"record\",\n"
        + "     \"namespace\": \"com.example\",\n"
        + "     \"name\": \"Customer\",\n"
        + "     \"doc\": \"Avro Schema for our Customer\",     \n"
        + "     \"fields\": [\n"
        + "       { \"name\": \"first_name\", \"type\": \"string\", \"doc\": \"First Name of Customer\" },\n"
        + "       { \"name\": \"last_name\", \"type\": \"string\", \"doc\": \"Last Name of Customer\" },\n"
        + "       { \"name\": \"age\", \"type\": \"int\", \"doc\": \"Age at the time of registration\" },\n"
        + "       { \"name\": \"height\", \"type\": \"float\", \"doc\": \"Height at the time of registration in cm\" },\n"
        + "       { \"name\": \"weight\", \"type\": \"float\", \"doc\": \"Weight at the time of registration in kg\" },\n"
        + "       { \"name\": \"automated_email\", \"type\": \"boolean\", \"default\": true, \"doc\": \"Field indicating if the user is enrolled in marketing emails\" }\n"
        + "     ]\n"
        + "}");

    // 1: create generic record
    GenericRecordBuilder customerBuilder = new GenericRecordBuilder(schema);
    customerBuilder.set("first_name", "John");
    customerBuilder.set("last_name", "Doe");
    customerBuilder.set("age", 25);
    customerBuilder.set("height", 170f);
    customerBuilder.set("weight", 80.5f);
    customerBuilder.set("automated_email", false);
    Record customer = customerBuilder.build();
    System.out.println(customer);

    GenericRecordBuilder customerWithDefaultsBuilder = new GenericRecordBuilder(schema);
    customerWithDefaultsBuilder.set("first_name", "John");
    customerWithDefaultsBuilder.set("last_name", "Doe");
    customerWithDefaultsBuilder.set("age", 25);
    customerWithDefaultsBuilder.set("height", 170f);
    customerWithDefaultsBuilder.set("weight", 80.5f);
    Record customerWithDefault = customerWithDefaultsBuilder.build();
    System.out.println(customerWithDefault);

    // 2: write generic record to a file
    GenericDatumWriter<Record> datumWriter = new GenericDatumWriter<>(schema);
    try (DataFileWriter<Record> dataFileWriter = new DataFileWriter<>(datumWriter)) {
      dataFileWriter.create(schema, new File("customer-generic.avro"));
      dataFileWriter.append(customer);
      dataFileWriter.append(customerWithDefault);
    } catch (IOException e) {
      e.printStackTrace();
    }

    // 3: read generic record from a file
    File file = new File("customer-generic.avro");
    GenericDatumReader<Record> datumReader = new GenericDatumReader<>(schema);
    try (DataFileReader<Record> dataFileReader = new DataFileReader<>(file, datumReader)) {
      // 4: interprete as a generic record
      while (dataFileReader.hasNext()) {
        Record next = dataFileReader.next();
        System.out.println("Full record: " + next.toString());
        System.out.println("First name: " + next.get("first_name"));
        System.out.println("Non existing field: " + next.get("not-here!"));
      }
    } catch (IOException e) {
      e.printStackTrace();
    }
  }
}
Avro Reflection Record
In this approach, a Schema can be derived from a POJO. This POJO must have a public constructor with no parameters. It uses a ReflectData class in order to “extract” the Schema.
Some POJO file could described as the following:
import org.apache.avro.reflect.Nullable;

public class ReflectedCustomer {

    private String firstName;
    private String lastName;
    @Nullable
    private String nickName;

    // needed by the reflection
    public ReflectedCustomer(){}

    public ReflectedCustomer(String firstName, String lastName, String nickName) {
        this.firstName = firstName;
        this.lastName = lastName;
        this.nickName = nickName;
    }

    public String getFirstName() {
        return firstName;
    }

    public void setFirstName(String firstName) {
        this.firstName = firstName;
    }

    public String fullName(){
        return this.firstName + " " + this.lastName + " " + this.nickName;
    }

    public String getNickName() {
        return nickName;
    }

    public void setNickName(String nickName) {
        this.nickName = nickName;
    }
}
Below, there is the code that generates Avro file based on reflection of the previously defined POJO:
import java.io.File;
import java.io.IOException;
import org.apache.avro.Schema;
import org.apache.avro.file.CodecFactory;
import org.apache.avro.file.DataFileReader;
import org.apache.avro.file.DataFileWriter;
import org.apache.avro.io.DatumReader;
import org.apache.avro.io.DatumWriter;
import org.apache.avro.reflect.ReflectData;
import org.apache.avro.reflect.ReflectDatumReader;
import org.apache.avro.reflect.ReflectDatumWriter;

public class ReflectRecordExamples {

  public static void main(String[] args) {

    // here we use reflection to determine the schema
    Schema schema = ReflectData.get().getSchema(ReflectedCustomer.class);
    System.out.println("schema = " + schema.toString(true));

    // create a file of ReflectedCustomers
    try {
      System.out.println("Writing customer-reflected.avro");
      File file = new File("customer-reflected.avro");
      DatumWriter<ReflectedCustomer> writer = new ReflectDatumWriter<>(ReflectedCustomer.class);
      DataFileWriter<ReflectedCustomer> out = new DataFileWriter<>(writer)
          .setCodec(CodecFactory.deflateCodec(9))
          .create(schema, file);

      out.append(new ReflectedCustomer("Bill", "Clark", "The Rocket"));
      out.close();
    } catch (IOException e) {
      e.printStackTrace();
    }

    // read from an avro into our Reflected class
    // open a file of ReflectedCustomers
    try {
      System.out.println("Reading customer-reflected.avro");
      File file = new File("customer-reflected.avro");
      DatumReader<ReflectedCustomer> reader = new ReflectDatumReader<>(ReflectedCustomer.class);
      DataFileReader<ReflectedCustomer> in = new DataFileReader<>(file, reader);

      // read ReflectedCustomers from the file & print them as JSON
      for (ReflectedCustomer reflectedCustomer : in) {
        System.out.println(reflectedCustomer.fullName());
      }
      // close the input file
      in.close();
    } catch (IOException e) {
      e.printStackTrace();
    }

  }
}
Avro Specific Record
This is a more elegant and sofisticated approach, in which a record Schema and its Builder are both automatically created from a .avsc (Avro Schema) file. This is different than previous methods, that are responsible for Schema generation in code, either by parsing String (GenericRecord) or by using Reflection (“ReflectRecord”).
A .avsc file is a common JSON file (text file), that describes the schema of data according to Avro Schema rules.
In order for this to work, Maven plugins must be configured (in the generate-sources Maven phase). They will read this .avsc resource file and generate the related source code automatically in the target dir.
So, the resulting Java code (which is a representation of Avro Schema and a Builder implementation of related POJO) can be directly referenced by our production code in order to create a Avro Record without the need to manually handle Schema generation.
In our pom.xml file, add the following plugins configuration:
<plugin>
  <groupId>org.apache.avro</groupId>
  <artifactId>avro-maven-plugin</artifactId>
  <version>${avro.version}</version>
  <executions>
    <execution>
      <phase>generate-sources</phase>
      <goals>
        <goal>schema</goal>
        <goal>protocol</goal>
        <goal>idl-protocol</goal>
      </goals>
      <configuration>
        <sourceDirectory>${project.basedir}/src/main/resources/avro</sourceDirectory>
        <stringType>String</stringType>
        <createSetters>false</createSetters>
        <enableDecimalLogicalType>true</enableDecimalLogicalType>
        <fieldVisibility>private</fieldVisibility>
      </configuration>
    </execution>
  </executions>
</plugin>
<!--force discovery of generated classes-->
<plugin>
  <groupId>org.codehaus.mojo</groupId>
  <artifactId>build-helper-maven-plugin</artifactId>
  <version>3.0.0</version>
  <executions>
    <execution>
      <id>add-source</id>
      <phase>generate-sources</phase>
      <goals>
        <goal>add-source</goal>
      </goals>
      <configuration>
        <sources>
          <source>target/generated-sources/avro</source>
        </sources>
      </configuration>
    </execution>
  </executions>
</plugin>
There should be a Avro file in ${project.basedir}/src/main/resources/avro. Let’s call it customer.avsc, and its content could be as below:
{
     "type": "record",
     "namespace": "com.example",
     "name": "Customer",
     "doc": "Avro Schema for our Customer",
     "fields": [
       { "name": "first_name", "type": "string", "doc": "First Name of Customer" },
       { "name": "last_name", "type": "string", "doc": "Last Name of Customer" },
       { "name": "age", "type": "int", "doc": "Age at the time of registration" },
       { "name": "height", "type": "float", "doc": "Height at the time of registration in cm" },
       { "name": "weight", "type": "float", "doc": "Weight at the time of registration in kg" },
       { "name": "automated_email", "type": "boolean", "default": true,
         "doc": "Field indicating if the user is enrolled in marketing emails" }
     ]
}
Finally, the following Java code demonstrates the creation of Avro file using Specific Record approach:
import com.example.Customer;
import java.io.File;
import java.io.IOException;
import org.apache.avro.file.DataFileReader;
import org.apache.avro.file.DataFileWriter;
import org.apache.avro.io.DatumReader;
import org.apache.avro.io.DatumWriter;
import org.apache.avro.specific.SpecificDatumReader;
import org.apache.avro.specific.SpecificDatumWriter;

public class SpecificRecordExample {

  public static void main(String[] args) {
    // 1: create specific record
    Customer.Builder customerBuilder = Customer.newBuilder();
    customerBuilder.setFirstName("John");
    customerBuilder.setLastName("Doe");
    customerBuilder.setAge(25);
    customerBuilder.setHeight(170f);
    customerBuilder.setWeight(80.5f);
    customerBuilder.setAutomatedEmail(false);
    Customer customer = customerBuilder.build();
    System.out.println(customer);

    File file = new File("customer-specific.avro");

    // 2: write to file
    DatumWriter<Customer> datumWriter = new SpecificDatumWriter<>(customer.getSchema());
    try (DataFileWriter<Customer> dataFileWriter = new DataFileWriter<>(datumWriter)) {
      dataFileWriter.create(customer.getSchema(), file);
      dataFileWriter.append(customer);
    } catch (IOException e) {
      e.printStackTrace();
    }

    // 3: read from file
    DatumReader<Customer> datumReader = new SpecificDatumReader<>(customer.getSchema());
    try (DataFileReader<Customer> dataFileReader = new DataFileReader<>(file, datumReader)) {
      // 4: interpret
      while (dataFileReader.hasNext()) {
        Customer next = dataFileReader.next();
        System.out.println(next);
        System.out.println("Name: " + next.getFirstName());
      }
    } catch (IOException e) {
      e.printStackTrace();
    }

  }
}
Reading Data from Avro file
Avro file have its format as binary by definition. So, a particular tool is required in order to read this binary content.
This tool is called Avro-Tools, and is presented as a JAR file that can be directly downloaded from Maven Repo, as presented below:
$ wget https://repo1.maven.org/maven2/org/apache/avro/avro-tools/1.9.2/avro-tools-1.9.2.jar
With this Jar at hand, it’s now possible to read content from an Avro file.
Reading Schema
$ java -jar avro-tools-1.9.2.jar getSchema <file>.avro
Reading Data (as JSON)
$ java -jar avro-tools-1.9.2.jar tojson --pretty <file>.avro
Schema Evolution
Schema Evolution is the ability to support changes in the schema. For instance, the following is a representation of a schema evolution (v1 -> v2):
- Schema (v1): firstName, lastName
- Schema (v2): firstName, lastName, email
Types of Schema Evolution
There are four types of Schema Evolution:
| type | description | in depth |
|---|---|---|
| Backward | when a schema can be used to read data from older schema | it is possible thanks to the default (new schema tries to read old data that has no value for a field, and then assume its default value for that field, since it was not found) |
| Forward | when a schema can be used to read data from newer schema | it is natural because data from a new schema read from an current schema will get no effect (new fields will be ignored). Delete fields in the new schema without default in the current schema is not forward compatible. |
| Full | both Forward and Backward | The best approach is to adopt this type; it is necessary to add fields with default values and only remove fields (in new schema) who have default values. |
| Breaking | neither Forward or Backward | Must avoid: a) Add/remove elements of a Enum; b) change the field type (i.e.: from string to int); c) rename a required, non-default field |
Forward Compatibility change is the most common in Kafka. It is a common scenario to start using a Producer with a newer Schema version, while the consumers keep working with the same (previous) version (a schema continues to work by reading data from newer schemas), and these consumers upgrade their schema versions later on.
Backward Compatibility change is less common. In that case, one must wait for all consumers to upgrade their Schema versions and, after that, new messages can start to be produced using the newer schema (a schema can be used to read data from old schemas).
It is better, in general, to adopt a full compatibility approach, since it is easy to do and brings a lot of benefits.
General Rules to Write an Avro Schema
- Make primary key
required - Define
defaultvalues for all field that must change somehow in the future - Try to avoid to use
Enums, since enum evolution are not supported - Do not rename fields. Use
aliasinstead - When evolving a schema, ALWAYS set
defaultvalues - When evolving a schema, NEVER remove a
requiredfield
Implementing a Schema Registry Pattern
Confluent Schema Registry is a implementation of a Schema Registry Pattern. It is a Confluent product, a separated component from Kafka distribution.
Producers and Consumers With Avro and Schema Registry
Using Confluent CLI tools, it is possible to produce and consume messages in Avro format:
$ kafka-avro-console-producer --bootstrap-server localhost:9092 --topic \
  test-avro --property schema.registry.url=http://localhost:8081 --property \
  value.schema=\
  '{"type": "record", "name": "myrecord", "fields": [{"name": "f1", "type":"string"}]}'

$ kafka-avro-console-consumer --bootstrap-server localhost:9092 --topic \
  test-avro --property schema.registry.url=http://localhost:8081 \
  --from-beginning
The value of schema.registry.url property requires a http protocol to be explicitly defined. If this property is not explicitly set here, Kafka will look for it in the default file property ( /etc/schema-registry/schema-registry.properties).
Confluent Schema Registry Operations
Using REST API (Confluent REST Proxy - more on that below on this page), it is possible to perform the following actions against schemas:
- Add Schemas
- Get Schemas
- Update Schemas
- Delete Schemas
Confluent REST Proxy
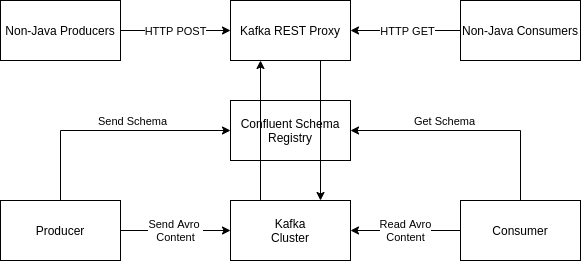
Figure: Confluent REST Proxy Overview.
Confluent REST Proxy is a tool to allow the interaction between Kafka and non-Java clients. It uses HTTP as a universal protocol for communication, and REST as its architectural style.
- It may or may not work with Avro (in the figure, Schema Registry can or cannot be used).
- Performance drops 3-4x in comparison to Java clients, but is still fast and acceptable for the majority of use cases.
- HTTP is slower than native, binary protocol
Starting REST Proxy
The basic command to start Confluent REST Proxy is the following:
[user@host confluent]$ ./bin/kafka-rest-start -daemon ./etc/kafka-rest/kafka-rest.properties
By default, Confluent REST Proxy will answer requests at port 8082, and will connect to Kafka Cluster at localhost:2181 (Zookeeper). So, the following curl HTTP GET call can be used to check if Kafka REST Proxy is responding properly:
[user@host confluent]$ curl localhost:8082/topics | jq
A list of local topics should be shown.
The Zookeeper URL that Confluent REST Proxy uses to connect to Kafka Cluster can be changed by adding the following property at kafka-rest.properties file:
zookeeper.connect=localhost:2181
It is also possible to configure Kafka REST Proxy to use Schema Registry. It is only necessary to enter the following property into kafka-rest.properties file:
schema.registry.url=http://localhost:8081
When configuring Schema Registry URL property, it is mandatory to declare the protocol (http or https).
Header Data
Content-Type
The following is the template for a Content-Type that clients send/receive to/from the server in request/response header:
Content-Type: application/vnd.kafka.[embedded_format].[api_version]+[serialization_format]
- embedded_format: the acceptable domain is:
json,binaryoravro - api_version: the choices are:
v1orv2. Always adoptv2. - serialization_format: always adopt:
json
If embedded format is binary, data must be sent as a base64-encoded string and the content type will be application/vnd.kafka.binary.v2+json. This base64-encoded string is decoded when reach Kafka Cluster (so the raw data is saved into Kafka topic, and not the encoded data).
If data is just JSON, you can use json as the embedded format, and the Content-Type will be application/vnd.kafka.json.v2+json
If your data is Avro data, the Content-Type will be application/vnd.kafka.avro.v2+json, and a schema (or schema ID) must be added into the request.
Accept
The following is the template for a Accept that clients send to the server in the response header:
Accept: application/vnd.kafka.[api_version]+[serialization_format]
Accept: application/json
The domains for api_version and serialization_format are the same from Content-type section above. api_version may not be informed (in that case, any version is accepted). Alternatively, application/json is also supported.
Possible/viable usages:
Content-type: application/vnd.kafka.json.v2+json
Accept: application/vnd.kafka.v2+json
        application/vnd.kafka+json
        application/json

Content-type: application/vnd.kafka.avro.v2+json
Accept: application/vnd.kafka.v2+json
        application/vnd.kafka+json
        application/json

Content-type: application/vnd.kafka.binary.v2+json
Accept: application/vnd.kafka.v2+json
        application/vnd.kafka+json
        application/json
Basic REST Operations
It is not possible to create topics using REST Proxy. The operations are related to visualization of topic data, messages production and consumption.
GET /topics
Get a list of Kafka topics.
Request:
GET /topics HTTP /1.1
Accept: application/vnd.kafka.v2+json
cURL call:
$ curl -H "Accept: application/vnd.kafka.v2+json" localhost:8082/topics | jq
Response:
HTTP 1.1 200 OK
Content-Type: application/vnd.kafka.v2+json

["topic1", "topic2"]
GET /topics/(string: topic_name)
Get metadata about a specific topic.
Request:
GET /topics/test HTTP /1.1
Accept: application/vnd.kafka.v2+json
cURL call:
$ curl localhost:8082/topics/test | jq
Response:
HTTP 1.1 200 OK
Content-Type: application/vnd.kafka.v2+json

{
  "name": "test",
  "configs": {
     "cleanup.policy": "compact"
  },
  "partitions": [
    {
      "partition": 1,
      "leader": 1,
      "replicas": [
        {
          "broker": 1,
          "leader": true,
          "in_sync": true,
        },
        {
          "broker": 2,
          "leader": false,
          "in_sync": true,
        }
      ]
    },
    {
      "partition": 2,
      "leader": 2,
      "replicas": [
        {
          "broker": 1,
          "leader": false,
          "in_sync": true,
        },
        {
          "broker": 2,
          "leader": true,
          "in_sync": true,
        }
      ]
    }
  ]
}
Producer with REST Proxy
We can use the topics api and the HTTP POST verb in order to produce messages to Kafka Cluster:
POST /topics/(string: topic_name)
In the following example, a cURL call will send two records in a single message to a Kafka topic:
$ curl -X POST -H "Content-Type: application/vnd.kafka.json.v2+json" \
  -H "Accept: application/vnd.kafka.v2+json" \
  -d '{"records": [{"value": {"lang": "Python"}},{"value": {"lang": "Java"}}]}' \
  localhost:8082/topics/test | jq
cUrl Response (one offset is returned per each record previously sent):
{
  "offsets": [
    {
      "partition": 0,
      "offset": 3,
      "error_code": null,
      "error": null
    },
    {
      "partition": 0,
      "offset": 4,
      "error_code": null,
      "error": null
    }
  ],
  "key_schema_id": null,
  "value_schema_id": null
}
The next example send two records as Avro messages to a Kafka topic:
$ curl -X POST -H "Content-Type: application/vnd.kafka.avro.v2+json" \
  -H "Accept: application/vnd.kafka.v2+json" \
  -d '{"value_schema": "{\"name\": \"Languages\", \"type\": \"record\", \"fields\": [{\"name\": \"lang\", \"type\": \"string\", \"default\": \"none\"}]}", "records": [{"value": {"lang": "Python"}},{"value": {"lang": "Java"}}]}' \
  localhost:8082/topics/test | jq
cUrl Response (one offset is returned per each record previously sent):
{
  "offsets": [
    {
      "partition": 0,
      "offset": 16,
      "error_code": null,
      "error": null
    },
  ],
  "key_schema_id": null,
  "value_schema_id": 101
}
It is important to consider that the payload (body request) must adopt the following structure for JSON sending:
{"records": [
  {"value": (JSON Object of Data)},
  {"value": (Another JSON Object of Data)},
  ...
  ]}
The next sections present examples extracted from the Confluent REST Proxy API Reference page:
Example: Binary Request
POST /topics/test HTTP/1.1
Host: kafkaproxy.example.com
Content-Type: application/vnd.kafka.binary.v2+json
Accept: application/vnd.kafka.v2+json, application/vnd.kafka+json, application/json

{
  "records": [
    {
      "key": "a2V5",
      "value": "Y29uZmx1ZW50"
    },
    {
      "value": "a2Fma2E=",
      "partition": 1
    },
    {
      "value": "bG9ncw=="
    }
  ]
}
Example: Binary Response
HTTP/1.1 200 OK
Content-Type: application/vnd.kafka.v2+json

{
  "key_schema_id": null,
  "value_schema_id": null,
  "offsets": [
    {
      "partition": 2,
      "offset": 100
    },
    {
      "partition": 1,
      "offset": 101
    },
    {
      "partition": 2,
      "offset": 102
    }
  ]
}
Example: JSON Request
POST /topics/test HTTP/1.1
Host: kafkaproxy.example.com
Content-Type: application/vnd.kafka.json.v2+json
Accept: application/vnd.kafka.v2+json, application/vnd.kafka+json, application/json

{
  "records": [
    {
      "key": "somekey",
      "value": {"foo": "bar"}
    },
    {
      "value": [ "foo", "bar" ],
      "partition": 1
    },
    {
      "value": 53.5
    }
  ]
}
Example: JSON Response
HTTP/1.1 200 OK
Content-Type: application/vnd.kafka.v2+json

{
  "key_schema_id": null,
  "value_schema_id": null,
  "offsets": [
    {
      "partition": 2,
      "offset": 100
    },
    {
      "partition": 1,
      "offset": 101
    },
    {
      "partition": 2,
      "offset": 102
    }
  ]
}
Example: Avro Request
POST /topics/test HTTP/1.1
Host: kafkaproxy.example.com
Content-Type: application/vnd.kafka.avro.v2+json
Accept: application/vnd.kafka.v2+json, application/vnd.kafka+json, application/json

{
  "value_schema": "{\"name\":\"userData\",\"type\": \"record\", \"fields\": [
    {\"name\": \"name\", \"type\": \"string\"},
    {\"name\": \"age\", \"type\": \"int\", \"default\": 0}]}",
  "records": [
    {
      "value": { "name": "Daniel", "age": 40 }
    },
    {
      "value": { "name": "Joao", "age": 32 },
      "partition": 1
    }
  ]
}
Example: Avro Response
HTTP/1.1 200 OK
Content-Type: application/vnd.kafka.v2+json

{
  "key_schema_id": null,
  "value_schema_id": 32,
  "offsets": [
    {
      "partition": 2,
      "offset": 103
    },
    {
      "partition": 1,
      "offset": 104
    }
  ]
}
Consumer with REST proxy
According to the Confluent REST Proxy API Reference page:
“The proxy can convert data stored in Kafka in serialized form into a JSON-compatible embedded format. Currently three formats are supported: raw binary data is encoded as base64 strings, Avro data is converted into embedded JSON objects, and JSON is embedded directly. Because consumers are stateful, any consumer instances created with the REST API are tied to a specific REST proxy instance. A full URL is provided when the instance is created and it should be used to construct any subsequent requests. Failing to use the returned URL for future consumer requests will result in 404 errors because the consumer instance will not be found. If a REST proxy instance is shutdown, it will attempt to cleanly destroy any consumers before it is terminated.”
There are some steps to be followed in order to read data from a topic:
Create the Consumer instance in the Consumer Group
POST /consumers/(string:group_name)
Example Request:
POST /consumers/testgroup/ HTTP/1.1
Host: kafkaproxy.example.com
Content-Type: application/vnd.kafka.v2+json

{
  "name": "my_consumer",
  "format": "json",
  "auto.offset.reset": "earliest",
  "auto.commit.enable": "false"
}
With cUrl:
curl -v -X POST -H "Content-type: application/vnd.kafka.v2+json" \
  -d '{ "name": "my_consumer", "format": "json", "auto.offset.reset": "earliest", "auto.commit.enable": "false" }' \
  localhost:8082/consumers/testgroup | jq
Example Response:
HTTP/1.1 200 OK
Content-Type: application/vnd.kafka.v2+json

{
  "instance_id": "my_consumer",
  "base_uri": "http://localhost:8082/consumers/testgroup/instances/my_consumer"
}
Subscribe to a Topic
Example Request:
POST /consumers/testgroup/instances/my_consumer/subscription HTTP/1.1
Host: proxy-instance.kafkaproxy.example.com
Content-Type: application/vnd.kafka.v2+json

{
  "topics": [
    "test1",
    "test2"
  ]
}
With cUrl:
curl -v -X POST -H "Content-type: application/vnd.kafka.v2+json" \
  -d '{"topics": ["test"]}' \
  http://localhost:8082/consumers/testgroup/instances/my_consumer/subscription \
  | jq
Example Response:
HTTP/1.1 204 No Content
Get Records
Example Binary Request:
GET /consumers/testgroup/instances/my_consumer/records?timeout=3000&max_bytes=300000 HTTP/1.1
Host: proxy-instance.kafkaproxy.example.com
Accept: application/vnd.kafka.binary.v2+json
Example Binary Response:
HTTP/1.1 200 OK
Content-Type: application/vnd.kafka.binary.v2+json

[
  {
    "topic": "test",
    "key": "a2V5",
    "value": "Y29uZmx1ZW50",
    "partition": 1,
    "offset": 100,
  },
  {
    "topic": "test",
    "key": "a2V5",
    "value": "a2Fma2E=",
    "partition": 2,
    "offset": 101,
  }
]
Example Avro Request:
GET /consumers/testgroup/instances/my_consumer/records?timeout=3000&max_bytes=300000 HTTP/1.1
Host: proxy-instance.kafkaproxy.example.com
Accept: application/vnd.kafka.avro.v2+json
Example Avro Response:
HTTP/1.1 200 OK
Content-Type: application/vnd.kafka.avro.v2+json

[
  {
    "topic": "test",
    "key": 1,
    "value": {
      "id": 1,
      "name": "Bill"
    },
    "partition": 1,
    "offset": 100,
  },
  {
    "topic": "test",
    "key": 2,
    "value": {
      "id": 2,
      "name": "Melinda"
    },
    "partition": 2,
    "offset": 101,
  }
]
Example JSON Request:
GET /consumers/testgroup/instances/my_consumer/records?timeout=3000&max_bytes=300000 HTTP/1.1
Host: proxy-instance.kafkaproxy.example.com
Accept: application/vnd.kafka.json.v2+json
With cUrl:
curl -v -H "Accept: application/vnd.kafka.json.v2+json" \
  localhost:8082/consumers/testgroup/instances/my_consumer/records?timeout=3000&max_bytes=300000 \
  | jq
Example JSON Response:
HTTP/1.1 200 OK
Content-Type: application/vnd.kafka.json.v2+json

[
  {
    "topic": "test",
    "key": "somekey",
    "value": {"foo":"bar"},
    "partition": 1,
    "offset": 10,
  },
  {
    "topic": "test",
    "key": "somekey",
    "value": ["foo", "bar"],
    "partition": 2,
    "offset": 11,
  }
]
Process Records
This is an application step. Read data is processed by the application in its particular way.
Commit the Offsets
Example Request:
POST /consumers/testgroup/instances/my_consumer/offsets HTTP/1.1
Host: proxy-instance.kafkaproxy.example.com
Content-Type: application/vnd.kafka.v2+json

{
  "offsets": [
    {
      "topic": "test",
      "partition": 0,
      "offset": 20
    },
    {
      "topic": "test",
      "partition": 1,
      "offset": 30
    }
  ]
}
With cUrl:
curl -v -X POST -H "Content-type: application/vnd.kafka.v2+json" \
  -d '{ "offsets": [{ "topic": "test", "partition": 0, "offset": 9 }]}' \
  localhost:8082/consumers/testgroup/instances/my_consumer/offsets
Response:
HTTP/1.1 200 OK
Delete the Consumer Group
With cUrl:
curl -v -X DELETE -H "Content-Type: application/vnd.kafka.v2+json" \
  http://localhost:8082/consumers/testgroup/instances/my_consumer
# No content in response
Response Header:
HTTP/1.1 204 No Content
In Production
- Adjust the configuration file:
confluent/etc/kafka-rest/kafka-rest.properties. - For several REST proxies, create several properties files and run different JVM process in order to scale
- Since it is not a cluster, it is required to put a load balancer to manage connections (AWS, HAProxy, NGinx, Apache, etc).
More information
It is also possible to handle partitions and brokers in terms of REST API. The detailed information can be found on the Confluent REST Proxy API Reference page.